Ad-link header

Friday, August 31, 2012

Carrot Cake with Dates


         This is one the simplest cakes that I have ever prepared and also one of the healthiest and yummiest.....Its texture is light and delicate and the cake retains its moisture and all this leads to an enhancement in its taste too.... 

         To make the cake healthier whole wheat flour has been used instead of plain flour....This cake is incredibly versatile.... It can be enjoyed with a cup of hot or cold coffee/ tea and it can be paired with custard or ice-cream to make a delicious dessert - a contrast in texture and temperature....The real specialty of this cake is that its delicious flavor can stand alone as it requires no frosting or icing--this one does hit the mark in that aspect....

         So here is my recipe for a delicious, chunky, nutty, moist carrot cake, filled with the fruity goodness of raisins and dates....
Its really perfect to prepare it for birthdays filled with lighted candles...I've once tried it for my dad's birthday & it came out to be a success.....

Ingredients

1.Carrot (grated)-3/4th cup
2.Dates (sliced)-1/4th cup
3.Cashew Nuts (chopped)-8 to 10(optional)
4.Raisins (chopped)-3 tbsp (optional)
5.Wheat flour-100gm (less than half cup)/All purpose flour-100 gm
6.Sugar-100gm (accordingly)
7.Butter-100 gm (melted)
8.Baking powder-3/4 tsp
9.Soda powder-3/4 tsp
10.Eggs-2
11.Vanilla Essence-1 tsp

Preparation (of batter)

~Grind wheat flour/all purpose flour with sugar to a smooth powder.
~Roast chopped nuts & raisins in 1 tsp ghee..just roast for 2 mins...(optional)
 ~Blend eggs, sugar powder mix & melted butter to a smooth paste.
~Pour it into a vessel & add carrots, dates, nuts, raisins, baking powder, soda powder & vanilla essence & mix well.
~Keep this batter for 1 hour.


You can bake this cake or prepare it in pressure cooker..i have pressure cooked this cake..its easy & moist too...

Preparation of cake (In pressure cooker)

~Keep a tin lid inside.
~Spread aluminium foil inside a deep  bottomed vessel which fits inside the pressure cooker.(the foil should reach the outside of the vessel..so you could just pull the foil out to take the cake out...)
~Pour the batter into this vessel.
~Place the vessel inside the cooker, on top of the lid inside, so there is no direct contact between the vessel & the bottom of the pressure cooker.
~Close the lid of the pressure cooker without the weight on.
~Now keep the cooker in medium flame for 10 mins.
~Reduce the flame to low for the rest 35 mins.
~Now open the lid & check the cake..(insert the end of a knife in the center of the cake) 
~If its not cooked, let it stay for 10 more mins.
~When cooked, pull out the cake with the foil, & let it cool to taste..

Yummy healthy cakey readyyy !!!


Thursday, August 30, 2012

Easy Pudding (with/ without) Tender Coconut (karikku/elaneer)


        This is an authentic Kerala dessert…Coconuts are something we Keralites are deeply in love with, infact we cannot imagine a life without coconuts in Kerala....Even the name Kerala is derived from the word ‘Kera‘ which means coconut tree.Every part of the coconut tree is used in some way or other.... Coconuts are used extensively in the delicious Kerala cuisine in different forms....

       Juice of tender coconuts(karikku) along with its flesh is the most delicious and healthy thing i’ve ever tasted in my life.....Back home, this is served as a welcome drink for special occasions and celebrations and is considered very royal....

        Most of the time after drinking the water, tender coconut is scooped out of the shell and eaten which has a sweet refreshing taste.... You could also puree the tender coconut along with the coconut water which tastes really phenominal....

       If you have tender coconut, you can use it in this pudding...it gives a remarkable taste to this pudding.....
      I'm introducing this recipe with two versions.We can prepare this pudding without tender coconut too.. For those who are staying outside India, might find it difficult to get tender coconuts...Even if you are provided with tender coconut water, you cant get the scoop from inside...So for those people who really want the taste of tender coconut, without using tender coconut can try this pudding...It really is equally tasty as the tender coconut one...This would be really pleasing to children...but i feel it suits for all ages...

Ingredients(if using tender coconut)

1.Milk-1/2 ltr (2 1/2 cup)
2.Sugar-14-15 tbsp/ Condensed milk- depending on sweetness required
3.China grass strands (agar agar)-3/4th of 1 packet
4.Coconut milk-1/2 cup(optional)
5.Tender coconut -scooped from  1 or 2 tender coconuts
6.Tender coconut water - 1cup

Ingredients (if not using tender coconut)

1.Milk-1/2 ltr (2 1/2 cup)
2.Egg-1
3.Sugar-14-15 tbsp/ Condensed milk- depending on sweetness required
4.China grass strands (agar agar)-3/4th of 1 packet
5.Coconut milk (thick/medium)-1 cup
6.Water-1 cup 
 
Agar-agar is a gelatinous substance derived by boiling..It  thickens when cooled..Just because of this property its used in puddings as a setting agent...It has no special flavors...

Preparation (if using tender coconut)

~Boil milk & sugar/ condensed milk in a saucepan.
~Can use  sugar & condensed milk together...Just be careful of the sweetness..Keep checking & add.
~Prepare coconut milk & keep it ready if using.
~Scrap off the smooth part from inside the tender coconut without its water.
~If its not really smooth you can puree it little with its water to become smooth.
~If its little crunchy also, its fine.
~Once the milk is cooked, remove from flame & let it cool.
~Now break the china grass & add 1 cup of tender coconut water to it & let it boil, so it dissolves completely in tender coconut water.
~Stir china grass occasionally (can add more tender coconut water/water  if required)
~When china grass is dissolved & ready to use, reduce its flame to simmer.
~Add the pureed tender coconut & coconut milk only after the milk mixture cooles down, otherwise the milk will curdle.
~Now pour coconut milk to the cooked milk & mix well.
~Add the prepared tender coconut paste to this milk & mix well.

Preparation (if not using tender coconut)

~Boil milk & sugar/ condensed milk in a saucepan.
~Can use  sugar & condensed milk together...Just be careful of the sweetness..Keep checking & add.
~Beat the egg lightly & add it to the milk before boiling & stir well.
~Prepare coconut milk & keep it ready.
~Once the milk is cooked, remove from flame & let it cool.
~Now break the china grass & add 1 cup of water to it & let it boil, so it dissolves completely in water.
~Stir china grass occasionally (can add more water if required)
~When china grass is dissolved & ready to use, reduce its flame.
~Add the coconut milk only after the milk mixture cooles down, otherwise the milk will curdle.
~Now pour coconut milk to cooked milk & mix well.

Preparation(of pudding...in both cases) 

~Now remove the dissolved china grass from flame & pour into this suddenly & mix well.
~Don't let it stay longer without mixing since it would harden.
~Pour water into the saucepan in which you have cooked china grass, else it would be difficult to clean.
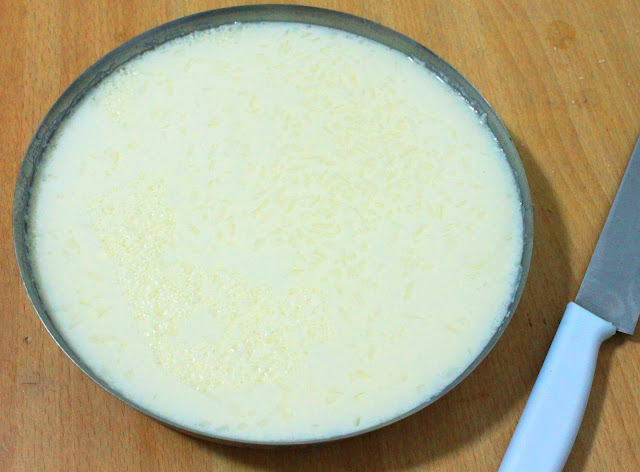
~Now pour this pudding mix into a thali (deep- bottomed plate).
~Let this cool, you can check if its becoming hard.
~Once its cool & hard enough (as its a pudding..medium hardness is only required), refrigerate it.
~Before serving cut into small blocks.

I had added no flavours like vanilla as it just tastes good without a flavouring...
 The mild natural flavour of tender coconut or coconut milk is irresistible!
Enjoy mouth melting delicate moments with coco pudding...!!!


Linking to: Pari's Show me your Dessert

Linking to : Soumya's Taste of the Tropics - Coconut   
& Mireille's Page


Linking to : Sameena's Milk sweet recipes

Linking to : Vardhini's Diwali Bash  


Linking to : Nayana's Celebrate Navratri/Diwali & Jagruthi's Page


Tuesday, August 28, 2012

Sambar (Indian Vegetable Stew)

    
           Sambar is very popular in the cooking of southern regions of India, especially in Tamil Nadu, Kerala, Karnataka and Andhra Pradesh.... Each state in South India prepares it with a typical variation, adapted to its taste and environment....

          A wide variety of vegetables may be added to sambar..... Typically sambar may contain one or several seasonal vegetables as the main vegetables in the soup....Its enhanced taste is derived from tamarind pulp & toor dal...

          Sambar is usually served with steamed rice.....Sambar with rice is one of the main courses of both formal and everyday south Indian cuisine..... Also vada sambar, idli & dosa sambar are popular for breakfast or lunch, and sambar is often served as a side dish at dinner too....

        Here i'm sharing South Kerala Stlye Sambar  recipe....I've got this recipe from my mom's friend Mrs.Vanaja Pillai...I used to visit her  from childhood mainly on Onam festival (feast of Kerala)...I used to love her sambar & payasam...My two favorites i used to have from there...Now i have started preparing sambar in her style since my husband is also fond of this..which is quite easier & tastier than my moms & mother-in-laws ....

Ingredients

1.Toor Dal- 1/2 cup
2.Cluster Beans (amarakkai)(kothamarakka)-15-20 (slit each beans into half & then cut into 2 or 3 pieces depending on its length)
3.Green Chilly-7 (slit into halves)
4.Garlic-10 pods (cut into small blocks)
5.Onion-2 (large..sliced)/ shallots-25 (thickly sliced)
6.Green Plantain (pacha ethakka)-1/2 (cut into thick blocks)
7.Yam (cheana)-1 small piece (cut into thick blocks)
8.Potato- 1 (small or medium....cut into thick blocks)
9.Snake Guard (padavalam)- 1/2 (cut into thick blocks)
10.Little gourd (ivy gourd)(kovakkai)-4 (cut into thick blocks)
11.Large cucumber(vellarikka)-1 small (cut into thick blocks)
12.Tomato-2 large (cut into thick blocks)
13.Carrot-1 (cut into thick blocks)
14.Lady'sfinger (okra) (vendakkai)-3 (cut into thick blocks)
15.Drumstick(muringakka)-1 (cut into thick blocks & slit them into half)
16.Asafoetida (kayam)-1/2 tsp
17.Salt
18.Tamarind pulp
(Soak 5 to 6 tamarind seeds in little water & squeeze them with your fingers & take the water)

Ingredients (for masala)

19.Fenugreek seeds powder (uluva podi)-1/2 tsp
20.Chilly powder-1 tsp
21.Coriander powder-2 1/2 tsp
22.Turmeric powder-1/4 tsp
23.Cumin seeds powder(cheriya jeeraka podi)-1/2 tsp

Ingredients (for seasoning)

24.Mustard seeds (kaduku)-1 tsp
25.Fenugreek seeds (uluva)-1/2 tsp
26.Shallots-5 (finely sliced)
27.Dry red chilly-1 (tore into half)
28.Curry leaves
29.Oil-2 tbsp

Preparation (of sambar)

~Clean & prepare all the vegetables. 
~Same vegetables need not be added..can change according to your wish.
~Can add pumpkin, brinjal etc.
~When preparing the vegetables make sure they don't become too small because they might dissolve in the masala.
~Can use onions or shallots or a mix of both..Shallots bring more taste to the gravy...
~Add ingredients 1 to 17 into a pressure cooker with water avoiding lady's finger & drumstick (water should be added enough to drown all vegetables)
~Close the lid & cook till 4 whistles.
~Open after the steam has released, & add ingredients 18 to 23 & mix well.
~Add lady's finger & drumstick & cook in medium flame.
~Check its taste & adjust salt, tamarind pulp & chilly powder .
~Cook till the gravy thickens & off the flame.

 Preparation (of seasoning)

~Heat oil in a small saucepan & add mustard seeds.
~Once they pop, add fenugreek seeds & stir for 1 min in low flame.
~As its color changer add sliced shallots & saute till it becomes transparent.
~If the cooked sambar is already spicy no need to add dry reed chilly, else add dry red chilly.
~Add curry leaves & off the flame & stir well.
~Add this seasoning to the sambar & mix well.

Mouthwatering sambar is ready to serve !!!

          Linking to : Chandrani's  Spotlight : Festive Food


Linking to :  Viji's Feast For Your Guru


Linking to : Lakshmi's Hubby's Delight


Sunday, August 26, 2012

Pepper Chicken


          This is a simple, straight forward recipe with all the basic ingredients that go into making a normal chicken curry and yet tastes quite different from the routine simple chicken curry flavor...

      Three of the most popular flavors, black pepper, lemon & fennel seeds powder are perfectly blended together which delivers the rich flavor....This curry goes well with white rice, rotis, dosas, appam & bread too..

       From ancient times, black pepper is one of the most widely traded spices in the world......It is not seasonal and is, therefore available throughout the year......You will get the sharp taste of pepper in the first mouthful itself..... So please feel free to adjust the spice level to suit your requirements.......

Ingredients(for marination)

1.Chicken-1/2 kg
2.Pepper-1/2 tsp
3.Salt-1/4 tsp
4.Lemon juice/ Vinegar-1 tsp

Ingredients(for masala)

5.Onion-3 (large)
6.Ginger(grated)-1 tsp
7.Garlic(grated)-1 tsp
8.Green chilly-2 (slit into half)
9.Whole Black pepper corns-1 1/4 tsp (grind little..not to a smooth powder)

                     When you grind your own pepper, you enhance the freshness of the pepper and probably get a better health benefit from it.....In addition, the outer skin of the peppercorn most likely enhances metabolism, leading to a higher probability of weight loss.  

10.Garam masala-1 tsp
11.Fennel seeds powder(perum jeeraka podi)-1/2 tsp
12.Turmeric powder-1/4 tsp
13.Soya sauce-1 tsp
14.Tomato-1 (large)
15.Coriander powder-1 tsp
16.Salt
17.Coriander leaves(chopped)
18.Curry leaves
19.Oil-2tbsp

Preparation

~Marinate the chicken with pepper, salt & lemon juice for atleast 1/2 n hour.
~Heat oil in a kadai & add onions with salt & saute.
~When done, off the flame & let it cool little & take 3/4th of the onions & grind it to a paste..(This step is optional)
~On the flame & add the onion paste & add green chillies along with ginger & garlic paste & saute for 2-3 mins.
~Add chopped tomato & saute till mushy.
~Add turmeric powder,coriander powder, pepper corn crushed(can use pepper powder instead..but pepper corns give the exact taste of pepper chicken), fennel seeds powder, soya sauce, coriander leaves, garam masala, little water & mix well & saute for 2 mins with medium flame.
~Add marinated chicken & mix well.
~Add 1/2 cup water & mix & close the lid & cook 10 to 15 mins until the chicken is cooked. (stir occasionally)
~Add curry leaves & check its taste..add salt & pepper according to taste.
~When cooked off the flame..The masala will get a darker shade once it rests.

Very spicy & juicy chickens are ready !!!
The aroma of freshly ground black pepper is difficult to ignore....


Linking to : Akila's Dish name starts with P


Thursday, August 23, 2012

Custard Fruit Salad

        
          This is a very delicious dessert with the creamy texture of the custard and the spongy crunch of the fruits in between...People from all age groups will definitely love to have Fruit Salad especially children ...
         This recipe is actually a blast from my past...My mom used to prepare it from my childhood.....Usually as a dessert for Eid...after the delicious biriyani....
         While they can be relished during all season, its a colorful and nutritious summer delight.....I have used Vanilla flavored Custard Powder which suits this Fruit Salad...Varieties of fruits can be used..depending on your taste...But i would recommend bananas, apples & mangoes...I personally think these fruits really bring out the taste of our dessert.

Ingredients

1.Banana-1
2.Apple-1
3.Mango-1
4.Strawberry-3 or 4
5.Kiwi-1
6.Pineapple-3 or 4 slices(canned pineapples in sugar syrup would be better)


7.Custard powder-3 tbsp


8.Milk-1/2 ltr (2 1/2 cup)
9.Sugar-4 tbsp
10.Sweetened Condensed Milk- 5 or 6 tbsp(optional..can use sugar instead)

Preparation(of fruits)

~Chop the fruits into small cubes and keep it ready in a bowl. 
~Sprinkle 1 tsp of sugar or honey immediately onto this fruit bowl and mix well with the fruits.
~ Mixing with sugar or honey helps prevent the change of color you see in the cut fruits like Banana and Apple (Maintains the fresh look of freshly cut fruits)
~You can also use the sugar syrup along with canned pineapples instead..Just pour little of it it into the fruit bowl & mix well...I think that would be easier.
~ Keep in refrigerator for about 30 minutes.

Preparation(of custard)

~Take vanilla flavored custard powder in a small bowl. Add 2 tbsp milk, mix well with a spoon into a paste without  lumps & keep aside.
~Boil the remaining milk in a saucepan (chaya pathram). 
~Add sugar to this milk and stir continuously until the sugar dissolves completely.
~Add the sweetened condensed milk little by little & mix well.
~Check the sweetness & add more sugar or condensed milk.
~Now add the  custard paste  to the boiling milk and stir for 5 minutes until the whole mixture turns thick & remove from the flame. 
~Make sure you leave the mixture to cool for 10-15 minutes.


Preparation (of fruit salad)

~Now add the fruits mixture to the custard paste and mix well.
~I prefer adding the fruits just before serving. 
~You can even add a scoop of ice cream on  top ...i added fruit salad flavored ice cream..


         A lip-smacking dessert that you can have after a spicy and hearty meal is ready..... It’s easy to make and the taste just leaves you asking for more !!!


Linking to : Pari's Show me your Dessert


Linking to : Sameena's Milk sweet recipes

Linking to : Vardhini's Diwali Bash  


Linking to : Nayana's Celebrate Navratri/Diwali & Jagruthi's Page


Wednesday, August 22, 2012

Crispy Chicken Fry

          Chicken fries are usually a must along with any food for any occasions specially for those who love chickens...So a little different from the normal chicken fries, lets try something more juicy inside & crispy from the outside.....Its really tempting, finger licking tasty & easy too...


Ingredients(for marination)

1.Chicken-1/4 kg
2.Chilly powder-1 tsp
3.Salt-3/4 tsp
4.Garlic-3 pods
5.Clove (Grambu)-1
6.Cumin seeds powder- 1/2 tsp
7.Coriander powder-1 tsp
8.All Purpose Flour (Maida)-1/2 tbsp
9.Cornflour-1 tsp  (optional)
10.Garam Masala-1/2 tsp


Ingredients (for coating)

11.Egg-1or 2
12.Chilly powder-1/4 tsp
13.Salt-1/4 tsp
14.Bread Crumbs-3/4 cup
15.Oil- for frying

Preparation

~Wash & pat dry the chicken properly(medium pieces would be better..not so big)
~Prick cuts all over the chicken with a knife.
~ Grind the garlic pods along with the clove.
~Mix all  marination ingredients along with the garlic clove  mix  in a bowl with little oil & water to a thick paste.
~Coat the chicken with this paste properly..even in the cuts.
~Marinate for atleast 1 hr in the fridge.
~When ready for frying, beat the egg with chilly powder & salt in bowl.
~Spread bread crumbs in a plate.
~Dip the chicken in the egg mix & roll over the bread crumbs & keep aside in plate.
~Heat oil in a kadai & deep fry it into golden brown.

Yummy & Crispy Chickens ready !!!

Thursday, August 16, 2012

Chicken 65 (Oil Free)


               Usually Chicken 65 is more popular in its dry state...This version of the chicken 65 is really very easy to make at home & has a finger licking taste too...This dish is being prepared in our family from the time i was born...My mom was a specialist on this...& i used to love this with Puris or Kerala Parathas...along with raitha..

Ingredients (for gravy)

1.Chicken-1 kg
2.Onion- 4 (large- chopped finely)
3.Green chilly-2 (slit into half)
4.Tomato ketchup-8 tbsp
5.Tomato paste-4 tsp
6.Soya sauce-2 or 3 tbsp
7.Curry leaves

Ingredients (for marination)

8.Chilly powder-1 tbsp
9.Salt-1 tbsp

Preparation

~Marinate  the chicken with chilly powder & salt & refrigerate for atleast 1 hr.(you can marinate at morning & take it & night)
~Heat a large kadai, & add the marinated chicken & cook one side for 1 min in medium flame.
~Then turn the chickens & cook for another 1 min ...You can see the color change of the chicken.
~Now add the chopped onions, green chilly, tomato ketchup, tomato paste, soya sauce, curry leaves & mix well.
~Close the lid & cook for 2 mins.
~Meanwhile boil 1/2 cup water in a saucepan nearby.
~Open the lid & pour the boiling water & mix well & cook for 5 mins with the lid on(Do stir in between)
~Add more curry leaves & check the tenderness of the chicken & its taste.
~Add more salt or chilly powder or tomato ketchup accordingly.

A great dish to have without much effort...Its a guarantee !!!!


Wednesday, August 15, 2012

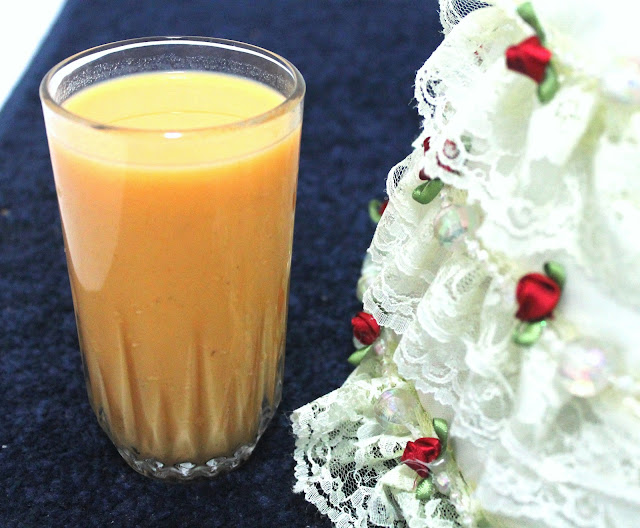
Carrot Shake (Hot / Cold)


        Carrot juices are really famous & we definitely need a carrot juicer for its purpose. This carrot shake below can be prepared without a juicer. Also, when in a juicer, we lose most of its fiber & nutrients when crushing the juice from carrots. 


          Here we pressure cook the carrots which is the easiest & energy efficient method in retaining its flavour & vitamins..Lets see how easy it is..

Ingredients

1.Carrots-3 (medium)
2.Milk-1 1/2 cup
3.Water-1 1/2 cup (can replace water with milk if you need it more thick)
4.Sugar-7 or 8 tbsps
5.Cardamom powder-1/2 tsp
6.Turmeric powder -1/4 tsp

Preparation

~Wash the carrots thoroughly & cut them into small pieces (need not be very small or in shape)
~Pressure cook them for 4 whistles with little water(carrots should be dipped in it) & turmeric powder.
~Drain 3/4th of the excess water & let it cool with very little water(just to get it grinded).
~Grind these carrots with the water to a smooth paste.
~Meanwhile, when grinding keep the milk in a saucepan to get boiled.
~When it starts boiling, reduce the flame to simmer.
~Now add the carrot paste little by little & stir the milk..
~I added 9 graceful tbsp of carrot paste.
~Add required amount of sugar along with cardamom powder & mix well.
~Now increase the flame & let it boil.
~When it starts boiling, off the flame & let it cool.
~You can have it hot as you wish or refrigerate it & use...

Easy & yummy carrot shake ready !!!!


Linking to : Pari's Show me your Dessert


Linking to : Sayantani's JCO-celebrate; Monsoon of India & Jagruthi's Page


Linking to : Sameena's Milk sweet recipes
Related Posts Plugin for WordPress, Blogger...

Recent Posts

Thanks


A big thanks for your valuable time reading my blog post...Your comments and feedback is very valuable to me & I would feel more happier.... Please feel free to leave your comments & suggetions for this post... Thanks a loot...
Try out my easy recipe & post its beautiful pic in my facebook page..
https://www.facebook.com/SajusTaste
or you can mail it to me..
~ SAJINA BISHAR